When undertaking any type of electrical work in the home it is sometimes necessary to check if an electrical device or circuit is conducting electricity properly. One way in which to do so is by carrying out an Electrical Continuity Test. This can be carried out by a qualified electrician or yourself, if you have the knowledge and equipment.
What exactly is Electrical Continuity Testing?
In the world of electronics, an Electrical Continuity Test checks the electrical circuit of any electrical device or appliance, and tests if the current flows between the two points of the circuit. In simple terms, the continuity test is carried out by using an electrical device called a multimeter or continuity tester. Both of which are small handheld devices.
Word of warning
You should only carry out this test when there is no current present. This therefore means that you need to unplug the electrical device or switch off the main circuit breaker before you start the test. There should e no electricity running through the wires. It is also important that you test the device that you will be using, prior to the checking of the electrical circuit and that you fully understand how to use it. It is no use carrying out a test if you do not understand how to perform it or what the results mean.
Multimeters and continuity testers
An electrical continuity test can be carried out wither by using a multimeter or a continuity tester.
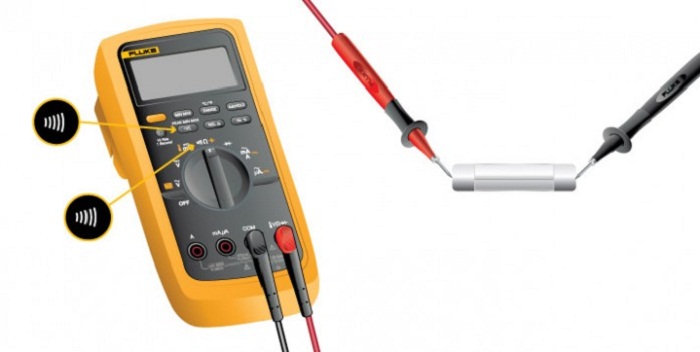
A multimeter is often used to carry out a continuity test which can easily measure the flow of electrical current. These can be as advanced or as simple as you like, with many devices also being able to check the amount of voltage passing through the circuit.
A continuity tester is usually a more basic design and tends to lights up to show that there is a current flowing through the circuit. Some designs also make a ‘buzzing’ sound.
How to use a multimeter or continuity tester
Firstly a continuity tester or multimeter is simply a device that houses a battery with a probe that is attached to one end of it. A test wire that also has an alligator clamp is attached to the other end. To begin the test, as already motioned you need to unplug the electrical device that you wish to test. Once this has been done you then need to dissemble it, in order to get at the component that you wish to test. The test works by the device sending an electrical current from one probe. If the circuit is working, the other probe should receive that current. If not then the circuit is broken and further investigation is needed.
- Switch on your tester. If using a multimeter, make sure to set it to continuity mode.
- Attach the clip to the wire or component that you wish to test
- The probe should touch the other component or wire in the circuit
- If there is a continuous circuit, then the tester should light up or make a sound, depending on the make and model
- If there is no light/sound or if there is an intermittent reaction, then the circuit flow is faulty.
When carrying out the conductivity test, it also doses not matter what probe goes where, as the test will work in either direction. You just need to ensure that both ends of the circuit are secured firmly for testing.
What can you check?
A continuity check is probably one of the most important electrical checks to be carried out to ensure that there is a closed electrical circuit. The test can be done on a range of electrical devices within the home. It can be used to check:
- If a wire is broken within the middle
- Quality of soldering two wires together.
- For checking headphone wires and power cables.
The main point to remember is that you need to know how to use your particular model of tester and that the device you wish to test is not plugged in. If you are at all unsure of how to perform the test, then use the services of a qualified electrician, especially if checking large electrical items.